|
Click Here to download this document as a PDF file
ESD Modular Carpet Tile Installation Guide Note: The following instructions should be reviewed prior to installation. Every effort has been made to provide accurate and reliable information in this guideline. This is only intended as a guide for our customer’s use with our recommended tools and materials. United SCP cannot accept any responsibility for loss or damage that may result from the use of this information, due to the possibility of variations of processing or working conditions and/or workmanship beyond our control. End user customers are advised to conduct their own tests for a particular application. We strongly recommend using a licensed and experienced flooring installer to ensure satisfactory results. These installation procedures are intended to assist in the installation of United SCP ESD carpet tile under most job conditions. Specific questions regarding installation and maintenance not covered within must be referred to the United SCP Technical Services Department at 719-676-3928. Any variance from these procedures will become the responsibility of the installer and not the manufacturer.
|
||||
|
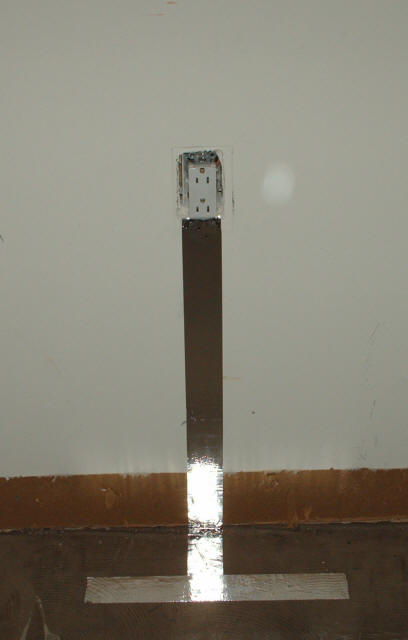
PRE-INSTALLATION PREPARATION: Check the quantity, color and lot numbers of the tiles before beginning the job. DO NOT MIX M.O. numbers (dye lots). Install by M.O. number sequence as indicated on the box. All claims for damages or deficiencies must be made prior to installation. GENERAL GUIDELINES: 1. The following installation guidelines as stated herein should be reviewed prior to installation. United SCP will not be held liable for product failure due to improper installation. 2. All other contractors should be finished with their work prior to installation. If work will be occurring simultaneously, take the necessary precautions to ensure a trouble-free installation. 3. The flooring contractor, general contractor or building owner must have the concrete slab tested for the following: surface pH, moisture transmission rate, and subfloor conditions. The results must meet our test guidelines as stated below. United SCP will not be held liable for installation failures if these guidelines are not strictly adhered to. SITE TESTING AND CONDITIONING: 1. Temperature — The floor temperature, carpet tile and adhesive must be maintained at a minimum of 65°F for 48 hours before the installation and remain at this temperature and/or not rise above 80°F at any time during installation and 24 hours after the installation. 2. Surface pH — the concrete must be tested for surface pH at several random points throughout the floor. The pH range necessary is 5 - 9. Otherwise, corrective action is required. 3. Moisture — the site must be tested for moisture randomly throughout the floor. Moisture testing should be performed by ASTM F 1869 Calcium Chloride Tests with moisture levels not to exceed 3.0 lbs. /1,000 sq. ft. in 24 hours, or ASTM F 2170 In Situ Relative Humidity Test with readings with moisture levels when measured by this method, not to exceed seventy-five (75) percent. If excessive moisture is present, the general contractor or building owner must be advised and a decision made if the installation is to begin. United SCP will not be responsible for any moisture related installation failures if these guidelines are not strictly followed. This maximum threshold must hold true throughout the life of the product. Otherwise, corrective action is required.GENERAL FLOOR PREPARATION: 1. Clean Floor — the floor must be clean and free of all foreign matter: grease, oil, paint, wax, dirt, dust, old adhesives or any material that might interfere with the overall bond strength of the adhesive. The floor should be sound and level. All holes, cracks, depressions or protrusions must be filled with a compatible Portland based patching compound, and then sealed with a latex liquid and allowed to dry. 2. Caution: Cutback asphaltic adhesive must be completely and thoroughly removed. No traces can come in contact with the newly applied adhesive. Failure to do so will result in an installation failure. SPECIFIC FLOOR PREPARATION: Concrete: New concrete must be clean, dry and cured for a minimum of 90 days and free of parting agents. Old concrete should be checked for moisture. Dry, dusty, porous floors may need to be sealed. Note: Sealers will not correct a moisture problem. Ceramic Tile and Terrazzo Floors: Ceramic tile floors cannot be loose. Any loose tiles must be removed. Grout lines must be filled and leveled. Strict attention must be paid to the open time for adhesive to become permanently tacky. VCT, Vinyl Tile and VAT: Damaged tiles should be filled or replaced, and loose tiles re-glued. Patching compounds should be used to level any floor irregularities and waxes should be fully eliminated to ensure a proper bond. VCT should never be sanded or scraped without proper safety and handling precautions. Special care and are required for asbestos tile abatement. Other Resilient Flooring: Homogeneous sheet vinyl and solid vinyl tile may need be removed before installation (contact United SCP for specifics). Old Carpet: Remove old carpet and adhesive. Steel Flooring: Steel trenches must be clean, level, dry and free from dust, paint or other extraneous materials. Wood: Plywood, hardwood and particle board used as subflooring must be a flooring grade and installed to manufacturer’s recommendations. Joints should be filled and any rough areas sanded smooth. Glossy surfaces need to be roughened prior to spreading the adhesive. SITE CONDITIONS — ENVIRONMENT: Radiant heat: Heat must be lowered before the installation to prevent floor adhesive from “setting” too fast. Sealers: The use of sealers on floor surfaces is generally not necessary except for sanded, dusty, porous, and acoustical surfaces. Sealing cannot overcome moisture conditions and must not be used for that purpose. When used, sealers must be thin and fast drying. They should be compatible with adhesives, which should be applied only after sealer is dry. ELECTRICAL GROUNDING: Install Grounding Strips: Locate AC power outlet. Remove electrical face plate cover (typically plastic). Starting at a location about ˝” beneath the outlet cutout (on the drywall) run a piece of our 2" wide aluminum foil ground tape down wall and onto clean dust free concrete (or other flooring substrate) about 2 or 3 inches. Note: for a great looking attachment cut any wall base, peel back base and run strip behind re-glued base. |
Run another aluminum foil strip (approximately 12” to 36" long) over this 2" or 3" piece that you've placed on the floor. Run this strip parallel to the wall and adhere to the flooring substrate (concrete, VCT, etc.). Please see figure 1. Lightly sand the foil on the floor with 320 grit emery paper or course scotch bright. Remove abrasive residue with a clean piece of paper towel. Replace plastic AC electrical face plate cover with a metal face plate cover making sure metal face plate cover contacts the aluminum strip. Please see figure 2. Your floor is now grounded. The ground foil on the wall may be painted if desired. United SCP recommends installing one ground point per every 1,000 square feet throughout the installation of the carpet tile.
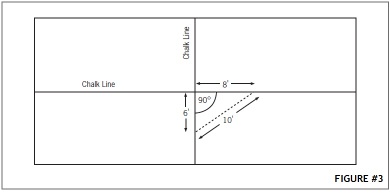
Apply Adhesive: Use only United SCP Conductive ESD Releasable Adhesive. This is a conductive, pressure-sensitive carpet tile adhesive designed for flooring applications. IMPORTANT — USE SUFFICIENT VENTILATION WHEN USING ADHESIVE. Trowel Notch Size: United SCP recommends using a 1/16” x 1-16” U notch trowel. Floor should have full coverage of adhesive for proper bonding of carpet tiles. Allow adhesive to dry fully before moving to next step- adhesive should be tacky when dry. (To make sure adhesive is fully dry/tacky, the adhesive should not transfer to your finger when touched.) Installing Carpet Tiles: Measure the area to find the best starting point for a maximum size perimeter tile. Proper planning should avoid trimming perimeter tiles more than half their width. Next, divide the room into 4 quadrants by snapping chalk lines on the floor from the center of each opposing wall. The two center lines must bisect at right angles in the center of the room. To achieve a perfect right angle (which is essential for a proper install) form a triangle by measuring 6’ x 8’ x 10’ (figure #3).
Using the chalk lines as your guide, begin laying the carpet tiles using the pyramid technique (figure #4).
Note: Loop pile tiles may have some yarn blossoming at the edges which may require trimming. Install one quadrant at a time following the numerical sequence. The corners of the tiles should lie flat with seams lightly touching. Do not jam carpet tiles; instead use a seam roller to blend carpet. CUTTING TECHNIQUES 1. Carpet Tiles may be cut by measuring and cutting from the back using a straight edge. Care must be taken to assure the arrows are pointing in the correct direction. 2. Carpet Tiles may also be cut by letting them cove up the wall and cutting with a cushion back wall trimmer or similar tool. DO NOT COMPRESS! POST INSTALLATION CARE 1. Roll the entire installation with a 75 lb. roller once it is completed. 2. Use plywood over the carpet when heavy objects are moved within 24 hours after installation. 3. A non-staining building material paper must be placed over the carpet to protect it when additional construction activity is to take place that would soil or stain it. Do not use plastic sheeting as it will trap moisture. UNITED CARPET ELECTRICAL PROPERTIES: United SCP ESD Carpet has been designed to provide an efficient conductive path-to-ground for static electricity occurring on the surface of the floor This flooring material is warranted to meet the following criteria when tested to ANSI ESD S7.1 and modified NFPA 99 Test Methodology: >1.0E04 and <1.0E09 |
|||
|
3 of 3
|
||||