Home

< Back   Home > 

ST-030 and DT-0030 Specifications and Installation

AEI  Single and Dual Threshold ESD Constant monitors, DUAL user's, (two wrist straps) and ESD Matting

Note: 110/120 Volt USA style 3 prong power plugs standard. 220 V overseas units available for any country. Please contact us for pricing on units going overseas.


ST-030 Specifications

Single threshold: This unit alarms with high resistance levels

Size

(h.w.d): 1" x 4" x 2.4"

Mounting

Velcro (supplied)/optional bracket

Operator

Fault Condition = Greater than 10 Meg Ohm

Bench mat

Fault Condition = Greater than 10 Meg Ohm

Power

115 VAC, 60 Hz (3 prong plug) Power Pack, 220V (overseas configurations) avaiable.

Visual Alarm

Dual Color LED Indicators:   Green = Safe, Red = Fault

Audio Alarm

Piezo Buzzer

Operation

Automatic, Unit is activated when operator plugs wrist strap connector into jack.


ST-030 Specifications

 Dual threshold: This unit alarms with high AND low high resistance levels

Size

(h.w.d): 1" x 4" x 2.4"

Mounting

Velcro (supplied) / optional bracket

Operator

Fault Condition = Greater than 10 Meg Ohm and < 511 K ohms

Bench mat

Fault Condition = Greater than 10 Meg Ohm

Power

115 VAC, 60 Hz Power Pack, optional 220V (overseas configurations).

Visual Alarm

Dual Color LED Indicators:   Green = Safe, Red = Fault

Audio Alarm

Piezo Buzzer

Operation

Automatic, Unit is activated when operator plugs wrist strap connector into jack.


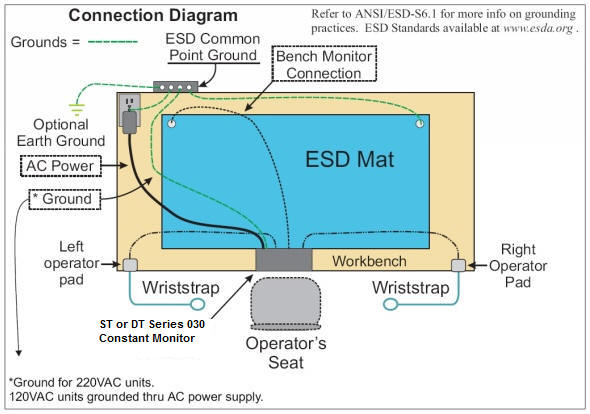
Connection Diagram for Both Units

ST/DT 030 Constant Monitor Instructions and Specifications

   
1. Mount the AEI ST-030 or DT-030 in a convenient place on the workbench using the Velcro supplied with the unit or the optional mounting bracket.  Mount the operator pads on either side of the workbench to keep them out of the way.
 
2. Plug the power adaptor into the unite and into a grounded outlet.  Both Led's should turn red and the buzzer should sound.  The ground in the outlet is an important part of the system and should also be connected to the ESD common point ground.  The outlet and the common point ground can be located at any convenient place on the workbench.
 
3. Plug the bench cable into the back of the unit and connect it to the bench mat.  It should be connected to the opposite side of the mat from the mat ground connection.  The BENCH LED should turn green.
 
4. Plug wrist straps into the operator pads. The OPERATOR LED should turn green when you put on the wrist straps.  If it doesn't, touch the wrist strap to the common point ground.  If the OPERATOR LED turns green then the wrist strap was not making good contact with the Operators wrist.
 
NOTE: The matting verification of the 030 series monitors works best with static dissipative tri layer matting (like our  UltraComfort or UltraTough) or dual layer matting with a conductive bottom layer and static dissipative top layer (like our ElectraTherm ESD rubber matting).  If using tri layer static dissipative matting the unit (and ground connection from the matting) must make contact with the conductive inner layer of the esd mat.  To insure this contact we recommend push and cinch fasteners as the first choice or our mat snap kit inserted into a very tight hole that has been punched in the mat. Some clients hardwire the bench cable to the fastener (the unit is supplied standard with an alligator attachment) or use the optional GC mini snap attachment.

Note: A calibration / test unit is available for the ST/DT-030s.  This unit allows the testing of the constant monitors on a "user defined" frequency. The Test Box may be sent back to use on a yearly basis for recertification thus negating the need to take the constant monitors out of service. This recertification may be purchased thru our shopping cart. click here - please follow the directions and thank you for visiting United SCP.


Contact UNITED Static Control Products Inc

© All Rights Reserved

w3c compliant

*