Titanium ESD Sheet Vinyl and URAS Adhesive
Titanium ESD Sheet
Vinyl and URAS Adhesive are PERFECT for use over Standard Epoxy,
Asbestos Flooring, most ANY standard hard surface flooring.
Click HERE for more information
Select URAS Max
(for permanent Installations) or
URAS Releasable
(for temporary installs and to reuse the flooring).
Place your order
Installation in a nutshell
-
Inspect material upon arrival. Store
the rolls standing.
-
Allow them to acclimate. Rough cut the
sheet vinyl to length and flatten.
-
Clean backing, remove dust, dirt and
loose carbon dust.
-
Prepare subfloor. Install 2" Siga
SuperTape around perimeter of room.
-
Install URAS (double cut seams).
Install grounding foil. Place sheet vinyl.
-
Roll the area all directions with a 100
pound vinyl roller.
-
Double cut slightly overlapped seams.
Groove and heat weld. The heat welds shall be structurally
sound and an integral part of the floor (not simply a filler
for the groove). Note: ALWAYS perform a mockup
test prior to installing the entire floor to confirm that
the bond strength and weldability are appropriate for your
installation.
Installation Overview
Click to Download
the full instructions as a pdf file
APPLICATION OVERVIEW: The area to
receive the flooring shall be well lit, dry and weather tight.
The HVAC system shall be functional and
set at a temperature of 65 to 75 degrees Fahrenheit at least 2
weeks prior to, during and after the installation. Prior to installing the Titanium flooring allow it
as well as the adhesive to acclimate
to the ambient environmental conditions of the installation area
for at least 72 hours.
NOTE: The Titanium sheet vinyl must lay flat and straight with no adhesive prior to installation. Due to
the inherent nature of the conductive backing wipe or mop the
backing clean of carbon dust, dirt and grime.
PREPARATION OF SUBSTRATES:
Well Bonded Epoxy, Vinyl Tiles and VCT:
Thoroughly sweep and Vacuum floor to
remove dust. Strip flooring of any wax, oil or grease using
ElectraStrip. Follow the directions for use!
Damp mop or auto scrub the existing floor with clean cool water mixed with 4
ounces of
ElectraClean to each gallon of water used. Allow the
area to dry thoroughly. Replace missing subfloor tiles and fill any
deviations with Mapei Plani Patch (a Portland based concrete
patching compound), smooth patched areas to create a level
and smooth profile to avoid shadow thru of subsequent covering
of the Titanium ESD Sheet Vinyl.
|
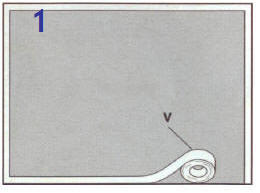 Install 2"
SuperTape: Starting at a distance of 1" from the wall or
perimeter of the area you wish to cover place a border of
2" wide United SCP Ultimate Bond SuperTape as is shown in V.
Click
HERE for more information on SuperTape Install 2"
SuperTape: Starting at a distance of 1" from the wall or
perimeter of the area you wish to cover place a border of
2" wide United SCP Ultimate Bond SuperTape as is shown in V.
Click
HERE for more information on SuperTape |
|

Install URAS:
Starting at wall attach sticky side of URAS to the
prepared substrate. Slowly walk backwards toward
opposite wall while lightly pulling on the run of
URAS to help alleviate wrinkles in the product.
Lower onto substrate. Double cut URAS to 2"
wide SuperTape and smooth top surface (covered with wax paper
liner) in place with a push broom. Repeat process
but slightly overlap runs of URAS. Double cut
overlapped seams of URAS.
Note: Do not remove liner from either the URAS nor the
SuperTape. All tapes should be flat and smooth prior to
installing the ESD sheet vinyl. |
|
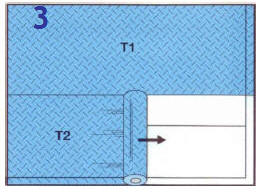 Rough
Cut Titanium Flooring:
Starting about 3" up wall unroll preconditioned Titanium
flooring over substrate as is shown in T1 and T2. Slightly overlap lengthwise
seams by about 1.5 inches (for subsequent double cutting of the
flooring). Rough
Cut Titanium Flooring:
Starting about 3" up wall unroll preconditioned Titanium
flooring over substrate as is shown in T1 and T2. Slightly overlap lengthwise
seams by about 1.5 inches (for subsequent double cutting of the
flooring).
Note: Do not remove liner from either the URAS nor
the SuperTape.
NOTE: The Titanium sheet
must lay flat and straight with no adhesive prior to
installation. The material may be loosely rolled back up
immediately prior to installation should this make the material
easier to handle during the installation phase. |
|
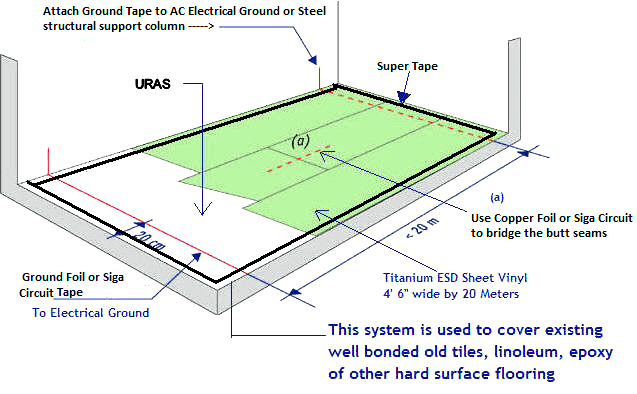
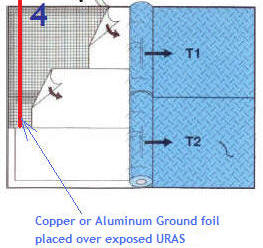 Installing
Ground Foil or Siga Circuit Tape and Titanium Flooring, 1st 1/2 of area:
Roll back floor covering runs T1
and T2 to the middle of the area (in the direction of the run).
Remove the liner from the exposed SuperTape (v). Starting at
wall, remove the liner from the exposed URAS for about a foot
(full width of install). Installing
Ground Foil or Siga Circuit Tape and Titanium Flooring, 1st 1/2 of area:
Roll back floor covering runs T1
and T2 to the middle of the area (in the direction of the run).
Remove the liner from the exposed SuperTape (v). Starting at
wall, remove the liner from the exposed URAS for about a foot
(full width of install).
About 6 inches from the wall
(and going over the exposed URAS) place a run of our
1/2 inch wide
copper ground foil
or our Siga Circuit tape the full length of install area (see red
line on the drawing). It is imperative that this strip make
reliable contact with the conductive backing of the flooring
material. the ground strip may also be placed over the
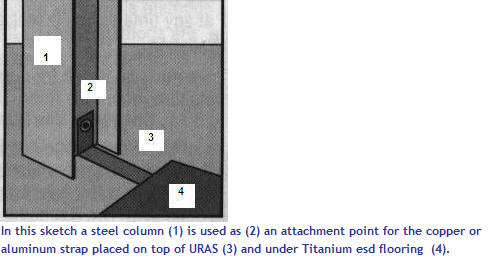
run of the SuperTape as well (if desired). The ground strips may be attached to an AC
electrical ground by an electrician or positioned to intersect
with an AC face plate cover and attached to ground as is shown
here
OR attached to a grounded metal column in the building as is shown
here.
Cut liner of URAS about 4
inches from where the exposed balance stops. Note: do not cut
thru URAS. Fold up the paper liner dross. This paper liner
material is fully recyclable, do a good deed, recycle it! Lay
the floor covering over the exposed tapes. |
|
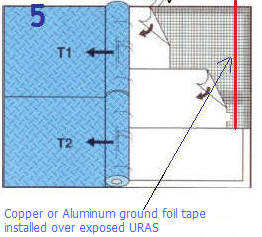
Installing Ground Foil and Titanium Flooring, 2nd 1/2 of
area:
Roll back floor covering runs T1
and T2 to the middle of the area where the liner covered
area stops. Remove the liner from the exposed SuperTape
(v). Starting at wall, remove the liner from the exposed
URAS for about a foot (full width of install).
Repeat the grounding process
shown in figure 4.
Fold up the paper liner dross. This paper liner material is
fully recyclable, do a good deed, recycle it! Lay the
floor covering over the exposed tapes Continue the length wise
overlap started on the 1st 1/2 (drawing 4). Double cut
overlapped lengthwise seams (both pieces at the same time) using
a hook blade knife. Remove dross. Loosely Trim ends to wall. |
|
|
 Roll flooring:
Roll flooring using a standard 100 to 150 pound vinyl roller. Roll flooring:
Roll flooring using a standard 100 to 150 pound vinyl roller. |
|
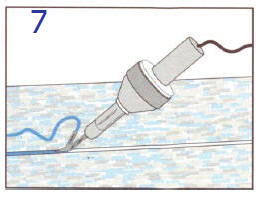 Heat weld seams
to industry accepted standards. Note: All heat weld shall
be structurally sound and an integral part of the floor (not
simply a filler for the groove). Heat weld seams
to industry accepted standards. Note: All heat weld shall
be structurally sound and an integral part of the floor (not
simply a filler for the groove).
Note
flooring may be heat welded immediately after installation.
Note:
Floor may
be opened to traffic immediately after install. |
MASTER DRAWING:
Click HERE to Contact United Static Control Products
United SCP Tames the Static Beast BEFORE
it Takes Another Byte!
© All rights Reserved
* |
